Saturday, February 28, 2015
Force carriage return in Excel cell
If you want to force a new line (carriage return) in an excel text cell, use ALT+ENTER.
Read more »
Installing Visual Enterprise 6 3 8 to co exist with version 5
Installing Visual 6.3.8 to co-exist with version 5
Install the new version of Visual 6.3.8 to the default locations.
Those default locations are:
C:Program FilesCentura
C:Program FilesVmfg
When prompted for the location to install the config files enter the path to vmfg.
C:Program FilesVmfg
After everything is installed open regedit and delete this key:
HKEY_CURRENT_USERSoftwareLilly SoftwareVISUAL ManufacturingConfigurationLocal Directory
If this key is left in the registry then the old version of visual will try to get it’s serial number from the new version of Visual.
Read more »
Install the new version of Visual 6.3.8 to the default locations.
Those default locations are:
C:Program FilesCentura
C:Program FilesVmfg
When prompted for the location to install the config files enter the path to vmfg.
C:Program FilesVmfg
After everything is installed open regedit and delete this key:
HKEY_CURRENT_USERSoftwareLilly SoftwareVISUAL ManufacturingConfigurationLocal Directory
If this key is left in the registry then the old version of visual will try to get it’s serial number from the new version of Visual.
Laptop Dell Vostro 3500 turns itself off without prior notification because of system becoming too warm
One day my wifes Dell Vostro 3500 Laptops started to turn itself off when in use without any warning message or notification. Turning it on again it worked for a while an then powered off again without any hint where the problem may be caused by.
How-i-fixed-it:
I turned out to be caused by the fan assembly air outlet being full of dust so that no air was going through it any more to cool down the system. To get to it to clean it means disassembling the whole system but following the procedure well described in the service Manual under "
Removing the Heat Sink and Fan Assembly",
it took me about an hour to get the job done and since that, the system is running fine again.
Heres the link to the Dell Vostro 3500 Service Manual:
ftp://ftp.dell.com/Manuals/all-products/esuprt_laptop/esuprt_vostro_notebook/vostro-3500_service%20manual_en-us.pdf
Update: Had to clean it again Apr. 2014. Seems like it need yearly maintenance... Here are some images how the fan assembly looked like:


Read more »
How-i-fixed-it:
I turned out to be caused by the fan assembly air outlet being full of dust so that no air was going through it any more to cool down the system. To get to it to clean it means disassembling the whole system but following the procedure well described in the service Manual under "
Removing the Heat Sink and Fan Assembly",
it took me about an hour to get the job done and since that, the system is running fine again.
Heres the link to the Dell Vostro 3500 Service Manual:
ftp://ftp.dell.com/Manuals/all-products/esuprt_laptop/esuprt_vostro_notebook/vostro-3500_service%20manual_en-us.pdf
Update: Had to clean it again Apr. 2014. Seems like it need yearly maintenance... Here are some images how the fan assembly looked like:
Automating Windows Azure Active Directory Module for Powershell Connections Office 365
I have been working on a PowerShell script to automated the Windows Azure Active Directory Module for Powershell Connection and login.
I started by exporting my password to a file so that powershell could load that from my script.
Then I created this powershell script to make the connection. At the bottom I added some powershell to tell us when the last DirSync was run too. This is set to utc by default, so I also convert that to Local Time.
Read more »
I started by exporting my password to a file so that powershell could load that from my script.
(get-credential).password|convertFrom-SecureString|set-content c:cred.txt
Then I created this powershell script to make the connection. At the bottom I added some powershell to tell us when the last DirSync was run too. This is set to utc by default, so I also convert that to Local Time.
 $pass = get-content C:cred.txt | convertto-securestring

 $cred = new-object -typename System.Management.Automation.PSCredential -argumentlist "superadmin@yourcompany.onmicrosoft.com",$pass

 $Session = New-PSSession -ConfigurationName Microsoft.Exchange -ConnectionUri https://ps.outlook.com/powershell -Credential $cred -Authentication:Basic -AllowRedirection

 Import-PSSession $Session | Out-String

 Connect-MsolService -Credential $cred | Out-String

 echo "Last Dir Sync Completed at:"

 $DATEutc = Get-MSOLCompanyInformation | select -expand LastDir*

 $DATEutc.ToLocalTime()
How to Delete Reset Wireless WiFi Profile in Windows 8 8 1 WLAN Profil löschen unter Windows 8 8 1
Randomly my Laptop refused to connect my company WiFi. I wanted to delete and re-add the wireless Profile manually to see, if this fixes it. In Windows 8.1, i did not find the wireless profiles manager known from Vista or 7.
How-I-fixed-it:
Steve Sinchak wrote a blog entry how to delete a wireless Profile in Windwos 8 / 8.1 using a command prompt.
See his solution here:
http://tweaks.com/windows/65347/how-to-delete-wireless-profiles-in-windows-8/
Read more »
How-I-fixed-it:
Steve Sinchak wrote a blog entry how to delete a wireless Profile in Windwos 8 / 8.1 using a command prompt.
See his solution here:
http://tweaks.com/windows/65347/how-to-delete-wireless-profiles-in-windows-8/
How to fix the Blue Screen BSOD 0x50 after applying update KB2982791 to Windows 7 64 bit from the Patch Tuesday Windows Updates from Aug 2014
Page fault in non-paged area - win32k.sys
References:
Microsoft Security Bulletin MS14-045
https://technet.microsoft.com/library/security/MS14-045
http://answers.microsoft.com/en-us/windows/forum/windows_7-windows_update/blue-screen-stop-0x50-after-applying-update/6da4d264-02d8-458e-89e2-a78fe68766fd
These are the Updates that are related to this problem with win32k.sys
For all supported x64-based editions of Windows 7:
Windows6.1-KB2982791-x64.msu
Windows6.1-KB2976897-x64.msu
Windows6.1-KB2982791-x64.msu
Windows6.1-KB2976897-x64.msu
For all supported 32-bit editions of Windows 7:
Windows6.1-KB2982791-x86.msu
Windows6.1-KB2976897-x86.msu
Windows6.1-KB2982791-x86.msu
Windows6.1-KB2976897-x86.msu
HOW TO FIX THE BSOD
Solution #1 - (Easy Fix) Delete the Font Cache
Delete c:WindowsSystem32FNTCACHE.DAT
Something in that file is triggering the BSOD.
Delete that file and the system will reboot without a bsod.
FNTCACHE.DAT will be recreated upon reboot, so there is no risk to deleting it.
http://www.reddit.com/r/sysadmin/comments/2dkc3g/warning_kb2976897_kb2982791_and_kb2970228_causing/cjqfl1ySomething in that file is triggering the BSOD.
Delete that file and the system will reboot without a bsod.
FNTCACHE.DAT will be recreated upon reboot, so there is no risk to deleting it.
Solution #2 - Uninstall Update KB2982791
When the BSOD (0x00000050) happens it will try to do a repair. After that fails, click the link that says:
View Advanced Options for System recovery and support
Login to the recover console
Open the Command Prompt
Remove KB2982791 using DISM using the following directions:
I have included the package name for Win7 x64.
I have included the package name for Win7 x64.
If you need to find your package name, here is the command:
DISM.exe /image:d: /get-packages
If you get an error, you might still find the package name in dism.log. Save the log from x:windowslogsDISMdism.log to a thumb drive if you need to find the package name using notepad on another PC.
I found this package name in the log file by searching the log for 2982791:
Package_for_KB2982791~31bf3856ad364e35~amd64~~6.1.1.1
KB2976897 was not installed on this PC
My windows 8.1 x64 PC has this package:
Package_for_KB2982791~31bf3856ad364e35~amd64~~6.3.1.3
dism /image:d: /remove-package /packagename:Package_for_KB2982791~31bf3856ad364e35~amd64~~6.1.1.1 /scratchdir:d: emp
Now your PC should boot.
Now run hotfix KB2908190 to fix the font problems linked to the BSOD.
http://hotfixv4.microsoft.com/Windows%207/Windows%20Server2008%20R2%20SP1/sp2/Fix463450/7600/free/470342_intl_x64_zip.exe
wusa /uninstall /kb:2982791 doesn’t work in the recovery console, you have to use DISM.

How to create a custom camera MATLAB Image Aquisition Toolbox Adaptor Device Third Party Adaptor to receive live video stream
Today i was wondering, how i can live stream images from my camera, which does not support winvideo, but comes with a custom SDK into MATLAB/Simulink.
How-i-fixed-it:
I used the Image Acquisition Toolbox™ Adaptor Kit to create an adaptor to create a custom adaptor (C++-DLL) using Visual Studio, like described here:
http://www.mathworks.de/de/help/imaq/creating-custom-adaptors.html
Description: The Adaptor Kit is a C++ framework that you use to create an adaptor to support new Hardware.
There are some open source KINECT imaq adaptor projects out as well to receive Microsoft KINECT RGB and depth data in MATLAB:
http://matkinect.sourceforge.net and http://sourceforge.net/projects/matkinect/
Heres a video that shows it working: http://www.youtube.com/watch?v=njstg3jnCg0
http://www.mathworks.com/matlabcentral/newsreader/view_thread/297204
Read more »
How-i-fixed-it:
I used the Image Acquisition Toolbox™ Adaptor Kit to create an adaptor to create a custom adaptor (C++-DLL) using Visual Studio, like described here:
http://www.mathworks.de/de/help/imaq/creating-custom-adaptors.html
Description: The Adaptor Kit is a C++ framework that you use to create an adaptor to support new Hardware.
There are some open source KINECT imaq adaptor projects out as well to receive Microsoft KINECT RGB and depth data in MATLAB:
http://matkinect.sourceforge.net and http://sourceforge.net/projects/matkinect/
Heres a video that shows it working: http://www.youtube.com/watch?v=njstg3jnCg0
http://www.mathworks.com/matlabcentral/newsreader/view_thread/297204
Office 365 Outlook 2013 OpenXChange OXTender 2 MAPI Mail profile error oxstor dll could not be loaded
Today i installed Office 365 in parallel to my existing Office 2010 on my Windows 8 Computer. Under Outlook 2010 i use OpenXChange OXTender 2 - Version 7.0.62 to sync with OpenXChange Groupware.
After installing Outlook i created a new mail profile. But in Outlook 2013 i cant open the MAPI Folder. Clicking on it an error message Pops up "The Folder could not be expanded.... MAPI was unable to load the Information service "oxstor.dll" ..."
I also re-installed OXTender, but this did not fix it. Under Outlook 2010 the sync is still working fine.
I posted the question here:
http://answers.microsoft.com/en-us/office/forum/office_365hp-outlook/cant-sync-outlook-2013-with-openxchange-because-of/f87f287c-e62a-4e5b-994c-da90769bf00c
https://forum.open-xchange.com/showthread.php?7769-Outlook-2013-quot-Der-Informationsdienst-quot-oxstor-dll-quot-konnte-nicht-geladen-werden-quot
How-i-fixed-it:
The document Outlook OXtender 2 Best Practices states, that it does not work having both Office 2013 and 2013 installed in parallel:
...
Please note that the following is not supported:
I removed Office 2010 from my Computer and re-installed Outlook OXTender again, created a new profile and... it works.
Here you can find the Information:
http://oxpedia.org/wiki/index.php?title=Outlook_OXtender2_Best_Practice
Read more »
After installing Outlook i created a new mail profile. But in Outlook 2013 i cant open the MAPI Folder. Clicking on it an error message Pops up "The Folder could not be expanded.... MAPI was unable to load the Information service "oxstor.dll" ..."
I also re-installed OXTender, but this did not fix it. Under Outlook 2010 the sync is still working fine.
I posted the question here:
http://answers.microsoft.com/en-us/office/forum/office_365hp-outlook/cant-sync-outlook-2013-with-openxchange-because-of/f87f287c-e62a-4e5b-994c-da90769bf00c
https://forum.open-xchange.com/showthread.php?7769-Outlook-2013-quot-Der-Informationsdienst-quot-oxstor-dll-quot-konnte-nicht-geladen-werden-quot
How-i-fixed-it:
The document Outlook OXtender 2 Best Practices states, that it does not work having both Office 2013 and 2013 installed in parallel:
...
Please note that the following is not supported:
- Office 2010 Home and Business test version
- MS Outlook running in a virtual environment (e.g. VMware or Parallels Desktop)
- Using both OL2007 and OL2013
- Using both OL2010 and OL2013
I removed Office 2010 from my Computer and re-installed Outlook OXTender again, created a new profile and... it works.
Here you can find the Information:
http://oxpedia.org/wiki/index.php?title=Outlook_OXtender2_Best_Practice
VW up! maps and more NAVIGON 7 10 25 CB1100 update error because of low memory
Today I tried to update my VW up! maps + more System to Software Version 7.10.25. Navigon Fresh told me, theres not enough space free in the built-in memory to make the update (Error CB1100). Heres how the error looks like:

The issue is also discussed in the upownersclub:
http://www.upownersclub.co.uk/forum/navigon-software-update-710_topic2759_page2.html
and german the up-szene.de
http://www.up-szene.de/forum/viewthread.php?thread_id=457.
and the danish VAGcars.dk
http://www.vagcars.dk/phpbb/viewtopic.php?f=2&t=54243&start=2820
and the german motor-talk.de
http://www.motor-talk.de/forum/maps-more-update-dezember-2012-probleme-t4350892.html
and in the netherlands
http://www.vwupforum.nl/viewtopic.php?f=8&t=1508&p=25167&hilit=update#p25167
and in upsociety.de
http://www.upsociety.de/index.php?page=Thread&threadID=149&s=bea86988b2710f377153f9496e9560edf7a09a31
and briskoda.net
http://www.briskoda.net/forums/topic/261824-move-fun-pid-update-71025-problemsolved/
Looking through the boards, the problem also seems to affect the Skoda Citigo Move & Fun. I did not find entries that its also affecting the SEAT Portable so far, but since its the same hardware it may be.
How-I-fixed-It:
Theres no real "fix" for this so far, just a workaround using an USB-Stick as temporary memory (Thanks to user nightbow in the upownersclub):
- You need an empty usb stick with 4GB or more.
- Copy all data from the navi on the stick.
- Deduct the navi from usb.
- Start the program navigon fresh and start the update!
- Software is updated on the USB stick now
- Finish navigon fresh
- Then naviagate on the usb stick to the folder NAVIGON map and delete some of the maps you dont need
- Connect the navi again and delete everything on it
- Copy all data from the stick on the navi andconnect it to the car
German / Deutsch (Danke an user CitiGo) im up-szene.de Forum:
- Die kompletten Daten vom internen Speicher auf den USB-Stick kopieren.
- M&M vom PC trennen.
- Navigon Fresh starten
- Der USB-Stick sollte jetzt als M&M erkannt werden
- Update starten
- Achtung: der Stick wird nach fertigstellung nicht mehr von Navigon Fresh erkannt
- Nach fertigstellung des Updates Navigon Fresh wieder beenden.
- Nicht benötigte Karten (xxxx.map) vom USB-Stick löschen. (NAVIGON->map)
- M&M wieder mit dem PC verbinden und den gesamten internen Speicher löschen.
- Den kompletten Inhalt des USB-Stick auf das M&M kopieren
- M&M vom PC trennen -> das M&M sollte jetz neu booten
- M&M mit dem Auto verbinden
Heres a little update this:
- Navigon Support told me to buy a 4 GB SD-Card to increase the device memory. But they were not able to tell me so far, whether the card has to stay always in the slot or not. So Ill not gonna buy anything before this is clear.
- User telephoneman in the motor-talk.de-Forum wrote, he got told by the Navigon Support to send it to them to get it replaced. According to Navigon this is a known issue!
Anyway.
- Today i contacted VW support directly on their free german support number 0800-8655792436 and a very friendly woman told me shell forward my request to the responsible people inside VW. She told me theyll get back to me within a day or two.
Heres the next update:
- The Lady called me back and said, since its a third-party product, I have to get this sorted out with Navigon directly. I should also see my local VW dealer to see, if they can help me there.
I got a new mail from the Navigon Support:
- If i use a SD-Card with no more than 4GB, than the device will store some of the data on this card. The Card then has to be ALWAYS in the device for it to work and they do not recommend storing Music on the Card
(In my words: If I do it like this, I will not be able to Play Music from th e SD Card any more.)
In the end they told me to talk to my VW dealer since hes responsible to handle this issue from their Point of view.
Latest update:
My VW dealer ordered a new Maps&More device for me. The new one does not show the issue.
Read more »
http://www.upownersclub.co.uk/forum/navigon-software-update-710_topic2759_page2.html
and german the up-szene.de
http://www.up-szene.de/forum/viewthread.php?thread_id=457.
and the danish VAGcars.dk
http://www.vagcars.dk/phpbb/viewtopic.php?f=2&t=54243&start=2820
and the german motor-talk.de
http://www.motor-talk.de/forum/maps-more-update-dezember-2012-probleme-t4350892.html
and in the netherlands
http://www.vwupforum.nl/viewtopic.php?f=8&t=1508&p=25167&hilit=update#p25167
and in upsociety.de
http://www.upsociety.de/index.php?page=Thread&threadID=149&s=bea86988b2710f377153f9496e9560edf7a09a31
and briskoda.net
http://www.briskoda.net/forums/topic/261824-move-fun-pid-update-71025-problemsolved/
Looking through the boards, the problem also seems to affect the Skoda Citigo Move & Fun. I did not find entries that its also affecting the SEAT Portable so far, but since its the same hardware it may be.
How-I-fixed-It:
Theres no real "fix" for this so far, just a workaround using an USB-Stick as temporary memory (Thanks to user nightbow in the upownersclub):
- You need an empty usb stick with 4GB or more.
- Copy all data from the navi on the stick.
- Deduct the navi from usb.
- Start the program navigon fresh and start the update!
- Software is updated on the USB stick now
- Finish navigon fresh
- Then naviagate on the usb stick to the folder NAVIGON map and delete some of the maps you dont need
- Connect the navi again and delete everything on it
- Copy all data from the stick on the navi andconnect it to the car
German / Deutsch (Danke an user CitiGo) im up-szene.de Forum:
- Die kompletten Daten vom internen Speicher auf den USB-Stick kopieren.
- M&M vom PC trennen.
- Navigon Fresh starten
- Der USB-Stick sollte jetzt als M&M erkannt werden
- Update starten
- Achtung: der Stick wird nach fertigstellung nicht mehr von Navigon Fresh erkannt
- Nach fertigstellung des Updates Navigon Fresh wieder beenden.
- Nicht benötigte Karten (xxxx.map) vom USB-Stick löschen. (NAVIGON->map)
- M&M wieder mit dem PC verbinden und den gesamten internen Speicher löschen.
- Den kompletten Inhalt des USB-Stick auf das M&M kopieren
- M&M vom PC trennen -> das M&M sollte jetz neu booten
- M&M mit dem Auto verbinden
Heres a little update this:
- Navigon Support told me to buy a 4 GB SD-Card to increase the device memory. But they were not able to tell me so far, whether the card has to stay always in the slot or not. So Ill not gonna buy anything before this is clear.
- User telephoneman in the motor-talk.de-Forum wrote, he got told by the Navigon Support to send it to them to get it replaced. According to Navigon this is a known issue!
Anyway.
- Today i contacted VW support directly on their free german support number 0800-8655792436 and a very friendly woman told me shell forward my request to the responsible people inside VW. She told me theyll get back to me within a day or two.
Heres the next update:
- The Lady called me back and said, since its a third-party product, I have to get this sorted out with Navigon directly. I should also see my local VW dealer to see, if they can help me there.
I got a new mail from the Navigon Support:
- If i use a SD-Card with no more than 4GB, than the device will store some of the data on this card. The Card then has to be ALWAYS in the device for it to work and they do not recommend storing Music on the Card
(In my words: If I do it like this, I will not be able to Play Music from th e SD Card any more.)
In the end they told me to talk to my VW dealer since hes responsible to handle this issue from their Point of view.
Latest update:
My VW dealer ordered a new Maps&More device for me. The new one does not show the issue.
Inter tel Voice Over IP Phones
I got a used Inter-tel IP phone off ebay that wouldnt let me program it using the 7/8 key combination.
I was able to telnet into the IP phone with the default password of iptpassw and use the command DBMN to tell it the IP settings.
After that it still couldn’t connect because the firmware was not compatible with the v9 IPRC. The phone was at v1.01 and needed 8.1.0.
I looked in the manual and found out that I need to flash the latest 8.1.0 firmware and it should be called ipp+.hex
My v.9.1.0.1 disc has lots of firmware, but not that one. I did find it on the v9.0.0.1 disc.
I held down the 5 and 6 to get the 770.4500 into download mode.
It assigned itself an address of 192.168.200.201.
I started the Upload utility and entered the IP address of 192.168.200.201 along with the default account (IPT) and password (iptpassw).
I changed my PC IP address to 192.168.200.200 so I could connect to the IP phone.
I started the upload and everything worked!
It looks like everyone was correct about the 770.4500 phones.
These older IP phones do not require an endpoint license.
My 8622 phones had to come with endpoint licenses at $200 a pop.
I DON"T have the Firmware for the 8622. I only have it for the 770.4500.
Read more »
I was able to telnet into the IP phone with the default password of iptpassw and use the command DBMN to tell it the IP settings.
After that it still couldn’t connect because the firmware was not compatible with the v9 IPRC. The phone was at v1.01 and needed 8.1.0.
I looked in the manual and found out that I need to flash the latest 8.1.0 firmware and it should be called ipp+.hex
My v.9.1.0.1 disc has lots of firmware, but not that one. I did find it on the v9.0.0.1 disc.
I held down the 5 and 6 to get the 770.4500 into download mode.
It assigned itself an address of 192.168.200.201.
I started the Upload utility and entered the IP address of 192.168.200.201 along with the default account (IPT) and password (iptpassw).
I changed my PC IP address to 192.168.200.200 so I could connect to the IP phone.
I started the upload and everything worked!
It looks like everyone was correct about the 770.4500 phones.
These older IP phones do not require an endpoint license.
My 8622 phones had to come with endpoint licenses at $200 a pop.
I DON"T have the Firmware for the 8622. I only have it for the 770.4500.
Removing the 100MB System Reserved Partition from Server 2008 R2 or Win7
Today I went to install System Center Data Protection Manager 2010 from Microsoft and I ran into a problem adding disks to my DPM protection disk pool.
Turns out Server 2008 R2 installed the System Reserved Partition (100MB) on the RAID array that I setup for DPM 2010 backup storage and not on the mirrored system partition like it should have. I could not convert the array from MBR to GPT that is required for disk arrays over 2TB until I got that partition off of there.
Here is how to delete the partition:
1) Open a command prompt with administrator privileges (right click => run as administrator)
Type:
bcdboot c:windows /s c:
You should get a message similar to:
Boot files successfully created.
2) Open the Disk Management GUI (you could use diskpart for scripts), locate the C: partition right-click and select “Mark Partition as Active”, select yes to the “do you want to continue message”
3) Reboot to confirm that everything is ok.
4) In Disk Management you can now delete the 100Mb System Reserved partition by right clicking on it and selecting “Delete volume”
Before I got the information above, this is how I did it.
This is more usefull if you have already deleted the System Reserved partition or messed it up some how and now need to delete it from the recovery console.
1. From Disk Management assign a drive letter to the System Reserved Partition so that you can access the files. They are hidden, so you will need to turn off the option to hide system files.
2. Copy bootsec.bak, bootmgr and the entire boot folder from the System Reserved partition to the c: drive.
3. Set the c: drive partition as active
4. Now you can delete the System Reserved Partition. I had to go recreate my RAID array after rebooting to the RAID BIOS to delete it. You might also be able to delete it using BartPE or WinPE.
5. Boot the OS from the installation DVD and choose repair.
6. Load RAID drivers if you need to and then go to the command prompt.
7. Run these commands to fix the MBR and boot sector.
Before I figured this all out I deleted the partition and my server wouldnt boot, so I had to work a little harder.
I had to get the files from another Server 2008 R2 server and put them on a thumb drive. Then I booted to the repair console and used xcopy with the /H switch (so that it would copy the hidden files to the c: system partition.)
Read more »
Turns out Server 2008 R2 installed the System Reserved Partition (100MB) on the RAID array that I setup for DPM 2010 backup storage and not on the mirrored system partition like it should have. I could not convert the array from MBR to GPT that is required for disk arrays over 2TB until I got that partition off of there.
Here is how to delete the partition:
1) Open a command prompt with administrator privileges (right click => run as administrator)
Type:
bcdboot c:windows /s c:
You should get a message similar to:
Boot files successfully created.
2) Open the Disk Management GUI (you could use diskpart for scripts), locate the C: partition right-click and select “Mark Partition as Active”, select yes to the “do you want to continue message”
3) Reboot to confirm that everything is ok.
4) In Disk Management you can now delete the 100Mb System Reserved partition by right clicking on it and selecting “Delete volume”
Before I got the information above, this is how I did it.
This is more usefull if you have already deleted the System Reserved partition or messed it up some how and now need to delete it from the recovery console.
1. From Disk Management assign a drive letter to the System Reserved Partition so that you can access the files. They are hidden, so you will need to turn off the option to hide system files.
2. Copy bootsec.bak, bootmgr and the entire boot folder from the System Reserved partition to the c: drive.
3. Set the c: drive partition as active
4. Now you can delete the System Reserved Partition. I had to go recreate my RAID array after rebooting to the RAID BIOS to delete it. You might also be able to delete it using BartPE or WinPE.
5. Boot the OS from the installation DVD and choose repair.
6. Load RAID drivers if you need to and then go to the command prompt.
7. Run these commands to fix the MBR and boot sector.
bootrec.exe /fixmbr
bootrec.exe /fixboot
bootrec.exe /rebuildbcd8. Reboot!
Before I figured this all out I deleted the partition and my server wouldnt boot, so I had to work a little harder.
I had to get the files from another Server 2008 R2 server and put them on a thumb drive. Then I booted to the repair console and used xcopy with the /H switch (so that it would copy the hidden files to the c: system partition.)
iOS7 iphone battery discharges drains too fast few tips
Apple has launched different version of its latest iphone operating system iOS7. iOS 7 do offer a great user experience and enhanced feature to an end user. But along with that it has bring new complaints and problems to Apple in multiple fields. One of them most affected feature are WiFi and battery drainage and most affected iphone user are iphone4s. Although this problem is also seen in new model of iphone5 and 5s.

iPhone 4s user were complaining that their device was working properly with iOS6 and upgrade to iOS 7 has pulled them into problems. I am sharing few tips to deal with these issues.
To Avoid battery issue in iphone you can try following things:
Avoid using continuous WiFi and 3G services : We generally tend to use our WiFi and 3G turned on even when we dont need it. There are so many apps in your iphone that will be continuously do somethings over the network like updating data, sending notification etc. By this you are putting your iphone in continuous working state. Some times it will result in heating up of iphone and thus quick drainage of battery.
Turn off unnecessary apps from doing updated automatically : Whenever you install a app by default for most of them they will be allowed to access internet from your device. By turning some of them off you can actually bring down load on your iphone. Along with that you should not use your location GPS service whenever not required. It is also a big source of battery drainage. Along with these you can also turn off some of the inbuilt feature which work continuously like "Reduce Motion" , "Siri - raise to speak". Use sensible setting like auto-brightness etc.

Its better to Sometimes restart your iphone: is your iphone is getting hot sometimes causing battery drainage: Its always recommended to give some break to your iphone before it does it by itself. Try to put habit to restart your iphone once or twice in a week, it will help in cleaning down some suspended activity/processes which will still use battery other resources of iphone. It will also make your phone work fast.
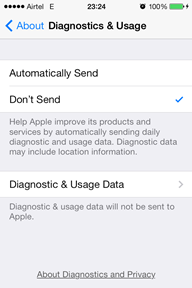
Try to analyze Diagnostic and Usage Data: Go to Settings->General ->About, Diagnostics & Usage, Diagnostic & Usage Data. At this place data regarding processes will be stored. Go through the list and check if there are any system processes with an abnormally large number of entries. Find the name of the troubled process it can be anything like iClound, calander etc. Or you can use third party software from App Store to monitor your process status.
Is this a hardware problem: I must say no.Because these kind of problem are occurring once user update iphone to new version of iOS. A faulty battery will give same response to all software release. Its the OS oprimization that should take care of battery usage among its different process operations. If nothing is working you should restore your old backup and live with it.
Let me know if this helped you.
Tips for a cutover migration to Office 365 with ADFS and Single Sign on
Here are some of my tips for a cutover migration to Office 365 with ADFS and Single Sign-on
When you read about converting mailboxes to mail-enabled users (MEUs) they dont mention Exchange 2010. So I opened a ticket with Microsoft and they confirmed that everything for 2007 will work with 2010, and it did.
This is the wiki on that subject:
Convert Exchange 2007 mailboxes to mail-enabled users after a staged Exchange migration
http://community.office365.com/en-us/wikis/exchange/845.aspx
Here are some problems I ran into converting mailboxes to MEUs:
- My primary smtp on Exchange 2010 still had a reference to skillsinc.local (along with skillsinc.com) after I changed all the UPNs from .local to .com and that was messing things up. When I looked in Office 365 none of my migrated mailboxes had .onmicrosoft.com aliases! Without that Federation will not work. I used ADMODIFY from Codeplex to remove all reference to skillsinc.local from my local AD. This blog does a great job detailing how to do that: http://seanofarrelll.blogspot.com/2012/07/how-to-federate-existing-office365.html Then I wrote a powershell script that added the .onmicrosoft.com alias to all the inboxes using Set-MsolUserPrincipalName to fix this problem. I will post that in another blog post.
- Make sure you are running your powershell commands and scripts in the correct window! Some run on your local exchange shell and some in the Office 365 shell (Microsoft Online Services Powershell module). Exchange2007MBtoMEU.ps1 must be run from your local exchange server shell to make the changes to your local Active Directory.
- Make sure you open the scripts and know what they are doing! If you get errors, stop everything and figure out what went wrong. Did you run it from the wrong shell? Is there something wrong with the .onmicrosoft.com alias or the primary smtp in AD? Look at the output in cloud.csv and see if any information is missing. Mine was missing the CloudEmailAddress because the .onmicrosoft.com alias was missing from all my cloud mailboxes. (See bullet point 1)
Windows Phone 8 Lumia 920 does not connect to company university WLAN any more Certificate issue
I had my Lumia 920 WP8 phone connected to my company / university WLAN at KIT (wkit-802.1x) for months without issues. A few days ago, it started to refuse to connect to the WLAN. It kept asking my for username and passwort and then just told me "Anmeldung nicht möglich" (german). I think the error message in english could be something like "Cannot connect" or "Could not connect to WLAN".
How-i-fixed-it:
The Problem seems to be caused by an issue with the root certificate the Network uses (Deutsche Telekom Root CA 2). I downloaded the certificate again as described on my university WLAN help page, sent it to myself by email and opened it on my phone. WP8 asked me to install the certificate and i confirmed.
After that, i tried to connect to WLAN again and it works!
Read more »
How-i-fixed-it:
The Problem seems to be caused by an issue with the root certificate the Network uses (Deutsche Telekom Root CA 2). I downloaded the certificate again as described on my university WLAN help page, sent it to myself by email and opened it on my phone. WP8 asked me to install the certificate and i confirmed.
After that, i tried to connect to WLAN again and it works!
Outlook 2007 Inbox shows blank mails with no date that cannot be deleted
Today i cleaned up my Outlook 2007 inbox and deleted some old mails. Suddenly a couple of mails in the list were shown blank (No sender/receiver, no subject) with the date "None".
Scrolling through the inbox list the scroll stuck as soon as i came to those entries. I could not select the entries nor delete them.
How-i-fixed-it:
I seems like the pst folder went corrupt.
I found the solution here: http://office.microsoft.com/de-de/outlook-help/durchsuchen-und-reparieren-fehlerhafter-outlook-datendateie-HA010075831.aspx
Office comes with a tool called "SCANPST.EXE". Its located under C:Program FilesMicrosoft OfficeOffice12
Close Outlook and start the tool. Then select the .pst-File that seems to have issues and the the tool repair it. I automatically creates a backup of the file before modifying it.
I let the tool repair the .pst file and my inbox was fine again.
Read more »
Scrolling through the inbox list the scroll stuck as soon as i came to those entries. I could not select the entries nor delete them.
How-i-fixed-it:
I seems like the pst folder went corrupt.
I found the solution here: http://office.microsoft.com/de-de/outlook-help/durchsuchen-und-reparieren-fehlerhafter-outlook-datendateie-HA010075831.aspx
Office comes with a tool called "SCANPST.EXE". Its located under C:Program FilesMicrosoft OfficeOffice12
Close Outlook and start the tool. Then select the .pst-File that seems to have issues and the the tool repair it. I automatically creates a backup of the file before modifying it.
I let the tool repair the .pst file and my inbox was fine again.
Tetra4D can kiss my ass
I have been using Adobe 3D technology since it first arrived with Adobe Acrobat 3D V.8. It has become the defacto standard for 3D CAD Model viewing since Adobe Acrobat is on just about every desktop.
We also view all the Boeing parts we make on the Boeing Portal using the Adobe Acrobat 3D PDFs that Boeing provides on REDARS.
The subject of my post today is not so much how well the software works, because it does a great job, but more about how poor the customer service is at Tetra4D.
When you buy a seat of Tetra4D 3D PDF Converter, you get an activation code. If you uninstall the software or move it to another PC you will need to open a ticket to get the activation reset.
Its been a week and I still dont have my activation reset.
When I opened a ticket asking for an activation reset, this is what I got. (31 hours later)
If you are upgrading from 3.5 to 3.6 your licenses will transfer right over for you. You can upgrade to 3.6 at www.tetra4d.com/download
Thats it. If it was that easy, I wouldnt have opened a ticket.
This was my response:
The person I’m updating today had Adobe X.
I uninstalled X and Tetra4D (I forget what version, but it was old)
Now that I installed 3.6 with XI Pro it asks me to reactivate.
I can’t see my activations because I don’t have access to the support portal. (I need a login for it)
That was 4 days ago. No response.
When I go to the website, the chat support is offline and they dont list a phone number.
They may think that they are the only show in town, but if this is there idea of support they can take their yearly maintanance fee and shove it up their ass.
They do have their offices in Seattle and Im about 40 minutes away from their office. Im thinking about knocking on their door. When they anwer, Im going to kick someone in the nuts.
Read more »
We also view all the Boeing parts we make on the Boeing Portal using the Adobe Acrobat 3D PDFs that Boeing provides on REDARS.
The subject of my post today is not so much how well the software works, because it does a great job, but more about how poor the customer service is at Tetra4D.
When you buy a seat of Tetra4D 3D PDF Converter, you get an activation code. If you uninstall the software or move it to another PC you will need to open a ticket to get the activation reset.
Its been a week and I still dont have my activation reset.
When I opened a ticket asking for an activation reset, this is what I got. (31 hours later)
If you are upgrading from 3.5 to 3.6 your licenses will transfer right over for you. You can upgrade to 3.6 at www.tetra4d.com/download
Thats it. If it was that easy, I wouldnt have opened a ticket.
This was my response:
The person I’m updating today had Adobe X.
I uninstalled X and Tetra4D (I forget what version, but it was old)
Now that I installed 3.6 with XI Pro it asks me to reactivate.
I can’t see my activations because I don’t have access to the support portal. (I need a login for it)
That was 4 days ago. No response.
When I go to the website, the chat support is offline and they dont list a phone number.
They may think that they are the only show in town, but if this is there idea of support they can take their yearly maintanance fee and shove it up their ass.
They do have their offices in Seattle and Im about 40 minutes away from their office. Im thinking about knocking on their door. When they anwer, Im going to kick someone in the nuts.
I lost forgot my Microsoft Office Product Key Serial Numbere How can i find it on my computer
I friend called me today. He wanted to re-install his Computer, but was able to find his Office 2010 product key any more.
How-I-fixed-it:
Using the Freeware Tool ProduKey by NirSoft you can read out the Product Keys or Serials of many Microsoft products installed on your Computer.
http://www.nirsoft.net/utils/product_cd_key_viewer.html
Heres a list of supported programs:
Microsoft Windows 98/ME
Microsoft Windows 2000 Microsoft Windows NT Microsoft Windows XP Microsoft Windows Vista Microsoft Windows Server 2003 Microsoft Windows 7 (Doesnt work with Microsoft Volume Licensing) Microsoft Windows 8 (Doesnt work with Microsoft Volume Licensing) Microsoft Office 2000 (Only ProductID is displayed) Microsoft Office 2003 Microsoft Office 2007 Microsoft Office 2010 Microsoft SQL Server 2000 Microsoft SQL Server 2005 Microsoft Exchange Server 2000 Microsoft Exchange Server 2003 Visual Studio
Read more »
How-I-fixed-it:
Using the Freeware Tool ProduKey by NirSoft you can read out the Product Keys or Serials of many Microsoft products installed on your Computer.
http://www.nirsoft.net/utils/product_cd_key_viewer.html
Heres a list of supported programs:
Microsoft Windows 98/ME
How to convert RGB images to CMYK colorspace with GIMP or ImageMagick freeware tools using dedicated icc color profile for upload to online printing service like flyeralarm saxoprint
I dont have Adobe Photoshop and Publisher 2013 does not Export CMYK Images. I wanted to send an Image to be printed to an online printing service (flyeralarm). They required the image the to be a jpeg, tif or PDF with images in CMYK color space using the „ISO Coated v2 300 % (ECI)“ color profile.
How-I-fixed-it:
I found a couple of ways, how to convert my RGB jpeg image to CMYK colorspace:
1. Using GIMP
Theres a plugin for the (great!) open source freeware GIMP (GNU Image Manipulation Program), which is called separate+ and can be found here. Download it and copy the required files to your GIMP Plug-Ins folder. You also need the ICC Color profiles, which can be downloaded from Adobe here. Copy the profiles to C:WindowsSystem32spooldriversColor
After that, GIMP color management allows you to select the desired Profile.
Theres a much more detailed description here (in German).
2. Using the "convert" tool of ImageMagick
Install ImageMagick on your computer.
You also need the ICC Color profiles, which can be downloaded from Adobe here. Copy the profiles to C:WindowsSystem32spooldriversColor
Using the command line type
convert sourcefile.jpg -profile Path_to_color_profile.icc outputfile.jpg
or, if you want a PDF:
convert sourcefile.jpg -profile Path_to_color_profile.icc outputfile.pdf
The detailed description can be found here (in German).
3. There are online Services that do the conversion for you:
http://www.rgb2cmyk.org/
http://www.cmykconverter.com/
Read more »
How-I-fixed-it:
I found a couple of ways, how to convert my RGB jpeg image to CMYK colorspace:
1. Using GIMP
Theres a plugin for the (great!) open source freeware GIMP (GNU Image Manipulation Program), which is called separate+ and can be found here. Download it and copy the required files to your GIMP Plug-Ins folder. You also need the ICC Color profiles, which can be downloaded from Adobe here. Copy the profiles to C:WindowsSystem32spooldriversColor
After that, GIMP color management allows you to select the desired Profile.
Theres a much more detailed description here (in German).
2. Using the "convert" tool of ImageMagick
Install ImageMagick on your computer.
You also need the ICC Color profiles, which can be downloaded from Adobe here. Copy the profiles to C:WindowsSystem32spooldriversColor
Using the command line type
convert sourcefile.jpg -profile Path_to_color_profile.icc outputfile.jpg
or, if you want a PDF:
convert sourcefile.jpg -profile Path_to_color_profile.icc outputfile.pdf
The detailed description can be found here (in German).
3. There are online Services that do the conversion for you:
http://www.rgb2cmyk.org/
http://www.cmykconverter.com/
HP LaserJet P2015dn shows only manual duplex under Windows 7 but auto duplex unit is installed
I set up a Computer with Windows 7 and a HP LaserJet P2015dn connected to it. All Drivers were installed by Windows during Setup.
But when printing, the Options for Duplex in Printer Settings only showed "Manual Duplex", but my Printer has an Auto Duplex Unit installed.
How-i-fixed it:
In found the solution here:
http://h30434.www3.hp.com/t5/Printer-All-in-One-Software-Drivers-e-g-Windows-8/Missing-auto-duplex-option-in-Win-7-for-LaserJet-P2015dn/td-p/675523
1. Click on the Start button.
2. Click on Devices/Printers.
3. Once the windows screen has popped up....scroll down to your Printers/Faxes section.
4. Right click on the P2015 printer icon.
5. In the drop down menu, select "Printer Properties"
6. Once the Printer Properties dialog box has opened, click on the device settings tab.
7. Scroll down to the Duplex Unit line and make sure this is set to installed. If not, use the pull down tab and change to installed. (see below pic.).

Read more »
But when printing, the Options for Duplex in Printer Settings only showed "Manual Duplex", but my Printer has an Auto Duplex Unit installed.
How-i-fixed it:
In found the solution here:
http://h30434.www3.hp.com/t5/Printer-All-in-One-Software-Drivers-e-g-Windows-8/Missing-auto-duplex-option-in-Win-7-for-LaserJet-P2015dn/td-p/675523
1. Click on the Start button.
2. Click on Devices/Printers.
3. Once the windows screen has popped up....scroll down to your Printers/Faxes section.
4. Right click on the P2015 printer icon.
5. In the drop down menu, select "Printer Properties"
6. Once the Printer Properties dialog box has opened, click on the device settings tab.
7. Scroll down to the Duplex Unit line and make sure this is set to installed. If not, use the pull down tab and change to installed. (see below pic.).
Dell XPS 12 screen auto orientation orientation randomly stops when in tablet mode under Windows 8 1
A few days ago i received my new Dell XPS 12 convertible ultrabook / tablet. I noticed, in tablet mode sometimes the screen quits auto-rotate and the auto-rotate on/off-button becomes inresponsive. I have to go to display settings manually and Switch back to 0 degress or do a reboot.
How-I-fixed-it:
Following the hints by guy_mx99 in this thread, i let Windows Update do a manual search on available updates. Under optional updates there were also listed 3 Windows 8.1 Drivers. After installing all optional updates Auto-Rotation now seems to work OK.
I noticed, the issue is discussed in some Forums already, so here are the links i found so far on this issue.
http://en.community.dell.com/support-forums/laptop/f/3518/p/19493100/20512873.aspx#20512873
http://en.community.dell.com/support-forums/laptop/f/3518/p/19528623/20500967.aspx
http://commweb-ps3.us.dell.com/support-forums/laptop/f/3518/p/19537377/20497975.aspx
http://answers.microsoft.com/en-us/windows/forum/windows8_1-hardware/switching-between-tablet-and-laptop-mode-on-dell/6908176b-1a4b-4399-a6d8-766e3331ce4a
http://answers.microsoft.com/en-us/windows/forum/windows8_1-hardware/screen-rotation-dont-work-propertly-on-xps-12-9q33/eff977a1-e1f4-4c91-ae4d-e6ca3e78d858
http://en.community.dell.com/support-forums/laptop/f/3518/p/20497926/reply.aspx
Read more »
How-I-fixed-it:
Following the hints by guy_mx99 in this thread, i let Windows Update do a manual search on available updates. Under optional updates there were also listed 3 Windows 8.1 Drivers. After installing all optional updates Auto-Rotation now seems to work OK.
I noticed, the issue is discussed in some Forums already, so here are the links i found so far on this issue.
http://en.community.dell.com/support-forums/laptop/f/3518/p/19493100/20512873.aspx#20512873
http://en.community.dell.com/support-forums/laptop/f/3518/p/19528623/20500967.aspx
http://commweb-ps3.us.dell.com/support-forums/laptop/f/3518/p/19537377/20497975.aspx
http://answers.microsoft.com/en-us/windows/forum/windows8_1-hardware/switching-between-tablet-and-laptop-mode-on-dell/6908176b-1a4b-4399-a6d8-766e3331ce4a
http://answers.microsoft.com/en-us/windows/forum/windows8_1-hardware/screen-rotation-dont-work-propertly-on-xps-12-9q33/eff977a1-e1f4-4c91-ae4d-e6ca3e78d858
http://en.community.dell.com/support-forums/laptop/f/3518/p/20497926/reply.aspx
Receive and display Kinect RGB and depth image from ROS using Matlab rosjava and matlab bridge interface
I was looking for a smart way (without having to compile much stuff on my own) on how to communicate with ROS from Matlab. I wanted to receive color and depth images published by a ROS node for the Microsoft Kinect camera and Display the Images on a Matlab GUI.
How-i-fixed-it:
Me and Google worked out together, how to get it done.
I used the ROS-Matlab Bridge created by Tingfan Wu at UCSD, which is based on rosjava. It can be downloaded under: https://code.google.com/p/mplab-ros-pkg/wiki/java_matlab_bridge.
The setup is described on the project page.
Next i did a svn checkout of the repository http://mplab-ros-pkg.googlecode.com/svn/trunk
The trunk has some updated files compared to the zip download dated 2012-10-23.
The project can either be used to run your own ROS master locally or to connect to another ROS master somewhere on the network. The HelloWorld.m example script is the point to start to make yourself familiar with the functionality of the software.
Based on this examples, i created my own script to subscribe to a kinect Images Publisher on my local network. I subsribed to the topics /camera/rgb/image_color and /camera/depth/image_rect.
I found the right hints on how to convert the sensor_msgs/Image message data to MATLAB Images here: https://alliance.seas.upenn.edu/~meam620/wiki/index.php?n=Roslab.KinectMatlab, written by Ben Cohen. My implementation is a little different to theirs, but it was a good point to start.
Heres my final result:

jmb_init();
%MASTER_URI=http://localhost:11311;
%Set URI of the ROS master
MASTER_URI=http://i60p23:11311;
%Set the name of your node
NODE_NAME=Kinect_Listener;
%Init the node
node=jmb_init_node(NODE_NAME, MASTER_URI);
%Setup a logger
logger=node.getLog();
%Subscribe to the RGB and depth messages
sub_rgb=edu.ucsd.SubscriberAdapter(node,/camera/rgb/image_color,sensor_msgs/Image);
%Set the read timeout
timeout=5;
%Setup a figure to draw onto
close all;
rect = [100, 100, 320, 500]
figure(Position,rect);
%Two variables to calculate the fps
lastTime = 0;
fps = 0;
%Get 500 frames and draw the images on the figure
for frame = 1:500
%Get the RGB image
msg=sub_rgb.takeMessage(timeout);
if isempty(msg)
timeStamp = msg.header.stamp.toSeconds;
%logger.info(sprintf(I got rgb image %dx%d, msg.width, msg.height));
lastTime = timeStamp;
else
fps = 1/(timeStamp-lastTime);
lastTime = timeStamp;
end
%Convert data type
%Re-Order the data into a matlab rgb array. The raw data has the
img_rgb(:,:,1) = reshape(data(1:3:end),640,480);
img_rgb(:,:,2) = reshape(data(2:3:end),640,480);
img_rgb(:,:,3) = reshape(data(3:3:end),640,480);
%Flip the values
img_rgb = flipdim(img_rgb,2);
%Rotate the image 90 degrees
img_rgb_rot = imrotate(img_rgb,90);
%Plot the image
subplot(2,1,1);
imshow(img_rgb_rot); title(sprintf(Kinect: RGB (%d@%2.1f fps),frame,fps),FontSize,14,FontWeight,Bold);
drawnow;
end
%Get the depth image
msg=sub_depth.takeMessage(timeout);
if isempty(msg)
%Re-Order the data into a matlab rgb array. The raw data has the
%Flip the values
img_depth = flipdim(img_depth,2);
%Rotate the image 90 degrees
img_depth_rot = imrotate(img_depth,90);
%Plot the image
subplot(2,1,2);
imagesc(img_depth_rot./max(img_depth_rot(:))); title(sprintf(Kinect: Depth),FontSize,14,FontWeight,Bold);
drawnow;
end
end
node.shutdown()
My System configuration:
Windows 8 Enterprise 64 Bit
Matlab 2013a 64 Bit
guava-13.0.1.jar
Read more »
How-i-fixed-it:
Me and Google worked out together, how to get it done.
I used the ROS-Matlab Bridge created by Tingfan Wu at UCSD, which is based on rosjava. It can be downloaded under: https://code.google.com/p/mplab-ros-pkg/wiki/java_matlab_bridge.
The setup is described on the project page.
Next i did a svn checkout of the repository http://mplab-ros-pkg.googlecode.com/svn/trunk
The trunk has some updated files compared to the zip download dated 2012-10-23.
The project can either be used to run your own ROS master locally or to connect to another ROS master somewhere on the network. The HelloWorld.m example script is the point to start to make yourself familiar with the functionality of the software.
Based on this examples, i created my own script to subscribe to a kinect Images Publisher on my local network. I subsribed to the topics /camera/rgb/image_color and /camera/depth/image_rect.
I found the right hints on how to convert the sensor_msgs/Image message data to MATLAB Images here: https://alliance.seas.upenn.edu/~meam620/wiki/index.php?n=Roslab.KinectMatlab, written by Ben Cohen. My implementation is a little different to theirs, but it was a good point to start.
Heres my final result:
Heres the MATLAB script:
%Init rosjava first
sub_depth=edu.ucsd.SubscriberAdapter(node,/camera/depth/image_rect,sensor_msgs/Image);
logger.warn(timeout);
else
%Read the timestamp
%Calculate the fps for frames > 0
if(frame == 1)
data = typecast(msg.data,uint8);
%format RGBRGBRGB.... beginning with the upper left image pixel
%(0,0). This format has to be converted to matlab format
logger.warn(timeout);
else
%format RGBRGBRGB.... beginning with the upper left image pixel
%(0,0). This format has to be converted to matlab format
img_depth = reshape(typecast(msg.data,single), msg.width, msg.height);
Some more info and connecting ROS and MATLAB can be found here: http://www.ros.org/wiki/groovy/Planning/MatlabMy System configuration:
Windows 8 Enterprise 64 Bit
Matlab 2013a 64 Bit
guava-13.0.1.jar
Subscribe to:
Comments (Atom)